
Thursday, September 11, 2008
Thursday, August 21, 2008
Sunday, August 17, 2008
Photoshop Tute 04
This lesson will teach you how to animate web Banner

You are going to be a better Web Graphic Designer NOW !!!!!!!!!!!

You are going to be a better Web Graphic Designer NOW !!!!!!!!!!!
I have explained how to create a text which seems like embossing from an Image(like in above web banner) in Photoshop Tute 02. Please refer that tute before this one.
You can learn how to make web banner by merging several images in Photoshop Tute 03.
Take 3 to 4 beautiful images goes with your theme of the web site
Merge them in the way I explained in Photoshop Tute 03

Now you can see that there is only one layer in the layer pallet instead of those two layers

Now you can make selection by a text layer in the way I explained in Photoshop Tute 02.
Likewise you can create two layers with different text like the sample banner
Now we are going to animate this banner
First select the upper layer
If you are working with later version of Photoshop you can go to windows -> Animation and take the animation pallet
Or else you have to go to image ready by clicking this tool

Select the second frame
Change opacity of the layer to 0
Then you can see second upper layer
Select those two frames by holding shift key and click “Tweens animation frames” button

You will get this diaglog box

Set frames to add to 10 and click OK
You will get 10 sequence of frames which reduces the opacity gradually.
Now click “palys animation” button of the the animation pallet
You can see the animation!!
Now stop the animation and click on the last frame which has o opacity
copy the frame by clicking on the “duplicate selected frames” button
Then set the opacity of the new frame to 100(you can’t see the bottom layer)
Select last frame and second last frame and click “Tweens animation frames” button
From the dialog box set frames to add to 10
Now you can see the animation in both direction
Try out your own animation changing color, position ……. of the layers.
Photoshop Tute 03
In this lesson you will learn
Take your canvas size as 1024pixels X150 pixels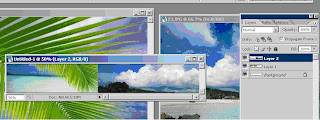
Easy handling of Layer mask
how to make web banner
Use of erase tool, zoom tool
Take your canvas size as 1024pixels X150 pixels
Open several Images and Take one image to the canvas
You can zoom canvas by using zoom tool(z)
Set the Image’s size suit to the size of the canvas
Set your second image too like in the previous step
Set the position of the second layer overlapping some part of the layer 1
You will get a canvas like this

Select the layer which overlap the first one
Add a mask to the layer by using the “add layer mask “ button at the end of the pallet

make sure layer mask thumbnail is selected
select erase tool
check whether your foreground color is white and take larger brush size for your brush
erase overlapping part of the layer
you will see that layer mask thumbnail has got a dark area . that is the place where you erased.
Think that you have erase more than you expected
Then only thing you have to do is just change the foreground and background(White & black) and erase
Then you will see what you erase is appearing
You can repeat above steps for the other images you have selected for the web banner
I will explain how to animate this web banner in the Photoshop or in ImageReady
Photoshop Tute 02
Making a Selection with Letters
for this use your favorite picture
Drag the image to the canvas
Type several words with Horizontal type tool
Then you will get a Text layer automatically
Using move tool, keep the text layer in the correct place of your canvas
Hold ctrl and click on the layer thumbnail
You will get a selection for your letters
Delete your text layer by clicking on the delete layer button at the bottom of the layer pallet
Select edit -> copy (make sure selection is available)
Select edit -> paste
With this you will get another layer
Make sure you are in the new layer and click on “add a layer style” button at the bottom of the layer pallet.
From the drop -down box select bevels and emboss
From the dialog box change Depth, size and so on . (make sure preview check box is checked)
Then you will get a Text emerging from the Image
Photoshop Tute 01
In this tutorial you will learn how to handle Selection
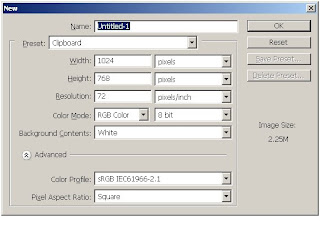
When you have loaded Photoshop , Go to file-> new to get your canvas. Initially get the preset size as 4 X 6 size as it’s easy to handle. If you take larger canvas area like you have to zoom frequently.
you can set your canvas properties here
Open a Image file by selecting the path file -> open (ctrl+O) or you can simply double click on the space (on the space expect a image file or canves) .

It will be like this.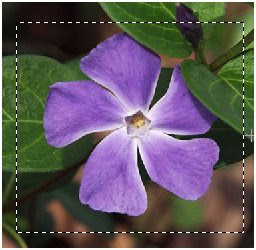


Try out following steps
Draw a path with path tool
Select path with path selection tool
Go to path pallet( windows ->paths)
Click on the side arrow(at top left corner)
Select make selection
Give a feather radius
feather radius is always used when you want to remove the boundaries of the image. To do so what you want to do is before you make the selection just add a value to feather option. To see the result, move your selection to a new layer.
How to make a new layer
1. Select windows -> layers
2. Press “create new layer” button at the bottom of the pallet.Then you will get a Transparent layer
3. Click on the layer in which you have made the selection using the layer pallet
4. Copy selection (Edit -> copy)
5. click on the new layer using the layer pallet
6. paste your selection
Next Tute will be on How to make selection with letters
When you have loaded Photoshop , Go to file-> new to get your canvas. Initially get the preset size as 4 X 6 size as it’s easy to handle. If you take larger canvas area like you have to zoom frequently.
you can set your canvas properties here
Open a Image file by selecting the path file -> open (ctrl+O) or you can simply double click on the space (on the space expect a image file or canves) .
select one of the following(in selection tool set). I will select Rectangular Marquee tool and drag over the area in the image.

It will be like this.
When you want to remove one section from this selection just click on the subtract option of the “Option tool bar” . If you can’t find this tool bar on the screen, Go to Windows -> option and select that

Then simply drag with Rectangular Marquee tool on the space which you want to remove from your selection and It will be like this.

Think you want to move your selection then you should be in the new selection mode of the option bar , ensure that you have selected a selection tool and move to the middle of the selection and just hold and move.
If you want to add new area to the selection you choose, simply hold shift key and draw your selection or else you can select add to selection mode of the option tool bar and add your selection. Like wise you can apply a intersection by selecting intersection mode of the option tool bar.
If you want to add new area to the selection you choose, simply hold shift key and draw your selection or else you can select add to selection mode of the option tool bar and add your selection. Like wise you can apply a intersection by selecting intersection mode of the option tool bar.
Single row marquee tool select only a area having a width of one pixel .
(Mean while think you did something wrong, you can make it correct using history pallet(windows -> history)
When you making a selection you can not only have pre-defined selection I introduced earlier but also your own selection with your own shapes. For that purpose we use the three kind of lasso tools which are in the tools pallet . Magnetic lasso tool select areas with same color. Think I want to select a leaf of the above flower use Magnetic lasso tool and what you have want to do only is to drag over the leaf .It will automatically connect to the edge of the leaf like a magnet.
Think you want to select a indigo area in the picture, give some tolerance value(20,32….) to the tolerance option of the option tool bar. You can see that indigo areas in the image have automatically selected. Try out giving larger number replacing tolerance value.
In addition to above mentioned methods you can make selection by drawing a path with pen tool.
Try out following steps
Draw a path with path tool
Select path with path selection tool
Go to path pallet( windows ->paths)
Click on the side arrow(at top left corner)
Select make selection
Give a feather radius
feather radius is always used when you want to remove the boundaries of the image. To do so what you want to do is before you make the selection just add a value to feather option. To see the result, move your selection to a new layer.
How to make a new layer
1. Select windows -> layers
2. Press “create new layer” button at the bottom of the pallet.Then you will get a Transparent layer
3. Click on the layer in which you have made the selection using the layer pallet
4. Copy selection (Edit -> copy)
5. click on the new layer using the layer pallet
6. paste your selection
Next Tute will be on How to make selection with letters
Saturday, August 16, 2008
Photoshop Tutriols
You can easily handle Photoshop , other Graphic and Animation softwares by reffering my tutorials. This tutes are going to explain them in a easy, undestandable way.
Subscribe to:
Posts (Atom)